This is a followup to my last post on working with Scrivener, TextExpander and Word in response to a couple of comments on that post.
The first question was:
I have wondered about styles and Scriv, more for bringing into InDesign. I would happily go through Word (OK, happily's a bit strong!). How does your script work? Could I please grab a copy?
My Word script works by applying Word styles in places that it finds the tags that I placed in Scrivener using TextExpander.
Here is the main, executable, function in the script:
Sub styleDocument()
' Change the whole doc to para style
ActiveDocument.Select
Selection.Style = "para"
' Replace the auto generated HTML style headers with styles
replace ("ChapterTitle")
replace ("H1")
replace ("H2")
replace ("H3")
styleTaggedText ("c80")
styleTaggedText ("ic")
styleTaggedText ("slug")
End Sub
First, it selects the entire document and changes the style of all text in the document to the "para" style. The para style is defined by my publisher in their Word template. Next, I call two of my other functions which you'll see in a second: replace and styleTaggedText.
When I compile a chapter from Scrivener, I use the Formatting compilation options to add certain tags at different levels in the outline. For instance, I add the tag <ChapterTitle> at the top level, <H1> and the second level, <H2> at the third level, etc. When I compile my chapter, Scrivener automatically adds these tags to the RTF file.
When I run my script, the replace function gets called, for each of these levels as you can see above. Here is the replace function:
Private Sub replace(textReplace)
With ActiveDocument.Content.Find
.Forward = True
.Text = "<" + textReplace + ">"
While (.Execute)
.Parent.Style = textReplace
.Parent.Text = ""
Wend
End With
End Sub
This function searches for the tag and styles the text with the same style name. Again, the styles ChapterTitle, H1, H2 and H3 are pre-defined in my publisher's Word template.
The other part of the script calls my styleTaggedText function:
Private Sub styleTaggedText(tag As String)
Dim styleRange As Range
Set styleRange = ActiveDocument.Content
Dim tempRange As Range
' Keep looping until there are no more c80 tags
While (ActiveDocument.Content.Find.Execute("<" + tag + ">"))
' Set the style range start and end
Set tempRange = ActiveDocument.Content
With tempRange.Find
.Forward = True
.Text = "<" + tag + ">"
.Execute
.Parent.Text = ""
styleRange.Start = tempRange.End
End With
Set tempRange = ActiveDocument.Content
With tempRange.Find
.Forward = True
.Text = "</" + tag + ">"
.Execute
.Parent.Text = ""
styleRange.End = tempRange.Start
End With
' Style the range
If tag = "c80" Then
styleRange.Style = "Normal"
ElseIf tag = "ic" Then
styleRange.Style = "InlineCode"
ElseIf tag = "slug" Then
styleRange.Style = "slug"
End If
Wend
End Sub
This function styles the text between my open and close tags with the given style name. Since I do technical writing, I have to apply styles inline. For example, code needs to be styled InlineCode if it is interspersed with text in a sentence. So, when I am writing in Scrivener, I write something like this:
Then, click on the <ic>-viewDidUnload</ic> method under the FirstProgramViewController.
When I run the styleTaggedText function in my Word script and pass in "ic", any text between the open (<ic>) and close (</ic>) tags gets styled with the InlineCode style.
Hopefully this gives a bit more insight into how the Word script works.
As I am writing, I am constantly using my tags. This is where TextExpander comes in. Instead of typing the opening and closing tags every time, I have shortcuts in TextExpander to write the tags for me. Additionally, in the TextExpander snippets, I can place the cursor anywhere that I want. So, to type that example above, I would type:
Then, click on the xic -viewDidUnload method under the FirstProgramViewController.
The xic snippet inserts <ic></ic> into Scrivener and places the cursor between the tags. Then, I just type the code that I want and use CMD-Left Arrow to go to the end of the sentence, past the closing tag.
The other question was:
Hi. I'm wondering if your workflow would work equally well with an app similar to TextExpander but cheaper. For example, Snippets, yType, and TypeIt4Me are all available on the Mac App Store for much less money but appear to do roughly the same thing. Any suggestions? Is there something that makes TextExpander worth the extra money?
I believe that this workflow would work fine with any app similar to TextExpander. Probably even Apple’s own text replacement functionality built into OS X. The one thing that I’m not sure about is the ability to put the cursor anywhere you want after your shortcut is expanded. My xic snippet is coded as <ic>%|</ic> in TextExpander. The %| is used to indicate the position of the cursor after the expansion. So, when I type xic, TextExpander expands that to the <ic></ic> tags and puts the cursor between the two, ready for me to type my styled code. That feature is very valuable to me as it saves me a fair amount of time.
Hopefully that answers your questions. If not, let me know in the comments and I’ll try to do a better job of explaining!

Wednesday, August 3, 2011
Friday, July 29, 2011
My Current Writing Workflow
Inspired by David Sparks and a Mac Power Users podcast on writing and workflows, here’s my workflow for delivering formatted Word files to my publisher via Scrivener, TextExpander, and some Script Fu.
I do all of my organizing, amalgamating, and writing tasks in Scrivener. I find that it is great for organizing my thoughts into sections in any given chapter. Using Scriv, my pet name, I can break up the manuscript any way that I want. Then, when I’m ready to send it off to my editor, I can compose my chapter for Word.
Unfortunately, the nature of my work requires that I use a ton of different formatting styles, defined in Word by my publisher. I need to apply different styles for code, figures, tables, etc. Word styles aren’t supported in Scriv, so I’ve devised a system of XML style tags to enclose text that should have a certain style in Word. I use TextExpander to quickly apply my XML tags using keyboard expansions (or Snippets in the parlance of TextExpander).
After I compile in Scriv, I open the resulting .rtf file in Word and run a custom script that I’ve developed to apply the appropriate style to text that is contained within my XML tags. The system has been working extremely well.
If anyone is interested in more details or wants a copy of my Word script, feel free to let me know in the comments or on Twitter (@pwalessi).
Good Luck with your writing projects!
Friday, April 22, 2011
Prototyping at the command line
Here’s a quick tip that comes in really handy for me all the time. When you are working on a complex algorithm or any other compartmentalized bit of code, try using a little command line program to work out the code. This isolates you from all of the overhead and complexity of building iOS GUI type applications and helps you focus on the essence of what you are trying to accomplish. It’s also helpful when you are not sure about what a certain class can do or you need to figure out how some method works.
Here’s how to set up a quick and dirty command line program:
Start up Xcode and from the File menu select New > New Project ….
In the dialog, select, “Application” under the Mac OS X section on the left hand side. Then, in the right pane, select, “Command Line Tool” and click Next.

Type the name of your project into the Product Name text box. Select “Foundation” in the Type drop-down box. The Foundation project type tells Xcode that you will be working in Objective-C and that you want to use the Cocoa Foundation framework. Click Next.

You will be prompted for a location to save your program. Pick a location that you will remember. I usually just throw these one off type of projects on to the desktop. Also, uncheck the “Create local git repository for this project” checkbox. You don’t need source control for one off prototype projects. Finally, click Create and your new project will be created.
Now, open up main.m and put any code that you want to test in the main function where the template has the NSLog “Hello World!” statement. You can use NSLog or printf to print to the output console. You can use scanf to get user input from the console.
I hope that you try this technique out. Good luck!
Here’s how to set up a quick and dirty command line program:
Start up Xcode and from the File menu select New > New Project ….
In the dialog, select, “Application” under the Mac OS X section on the left hand side. Then, in the right pane, select, “Command Line Tool” and click Next.
Type the name of your project into the Product Name text box. Select “Foundation” in the Type drop-down box. The Foundation project type tells Xcode that you will be working in Objective-C and that you want to use the Cocoa Foundation framework. Click Next.
You will be prompted for a location to save your program. Pick a location that you will remember. I usually just throw these one off type of projects on to the desktop. Also, uncheck the “Create local git repository for this project” checkbox. You don’t need source control for one off prototype projects. Finally, click Create and your new project will be created.
Now, open up main.m and put any code that you want to test in the main function where the template has the NSLog “Hello World!” statement. You can use NSLog or printf to print to the output console. You can use scanf to get user input from the console.
I hope that you try this technique out. Good luck!
Saturday, January 29, 2011
The Facade design pattern
Sorry that it’s been so long since my last post. After finishing my book, I needed to take some time to catch up on some projects that needed some attention. Plus, my Call of Duty game needed some attention as well.
Anyway, on with the post.
The first design pattern that I’s like to cover is called the Facade. Just as an architectural facade is the face of a building, a software facade is the face of a class or set of classes. Designers use the Facade pattern to cover over or conceal the actual interface used to talk to a class. Often times, a Facade is used to provide a simple interface to a class that has a complex interface. You can also use a Facade to provide a consistent interface, or set of methods, to a class that may change.
Imagine that you are designing a software library for talking to a database. You know that you will need to expose methods for calling Insert, Update and SQL execution functions. In order to call these functions, you need to use specific function calls that are exposed by the database. At the beginning of the project, you are told that you are going to use an Oracle database, but you know that the customer is fickle and may change the database on you at any time. This is the perfect time to use a Facade.
You could design a database facade class that exposes some general database methods like insert, update and execute. Then, you can code the facade to use the appropriate calls for your chosen database. All of the code in your project that needs to talk to the database will be coded to talk to the Facade and use the general methods that you have defined.
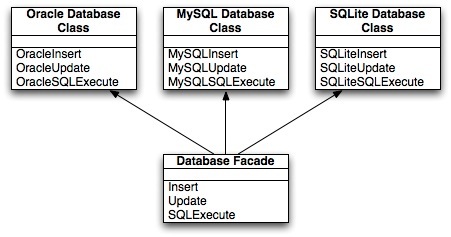
The beauty of the pattern becomes evident when the customer decides to change the database. Instead of changing the database calls all over your application, you need only change the facade. The facade hides the complexity of it’s underlying classes and exposes a common set of methods that any user of the class would need. The users of your database facade won’t care if they are pointed to an Oracle, MySQL or SQLite database. All that they will need to know is the interface that is exposed by your facade.
So, when you are designing a system where the underlying pieces may change, consider using a Facade. Using this pattern will save you time and effort when your customer changes his or her mind, which they are apt to do.
Anyway, on with the post.
The first design pattern that I’s like to cover is called the Facade. Just as an architectural facade is the face of a building, a software facade is the face of a class or set of classes. Designers use the Facade pattern to cover over or conceal the actual interface used to talk to a class. Often times, a Facade is used to provide a simple interface to a class that has a complex interface. You can also use a Facade to provide a consistent interface, or set of methods, to a class that may change.
Imagine that you are designing a software library for talking to a database. You know that you will need to expose methods for calling Insert, Update and SQL execution functions. In order to call these functions, you need to use specific function calls that are exposed by the database. At the beginning of the project, you are told that you are going to use an Oracle database, but you know that the customer is fickle and may change the database on you at any time. This is the perfect time to use a Facade.
You could design a database facade class that exposes some general database methods like insert, update and execute. Then, you can code the facade to use the appropriate calls for your chosen database. All of the code in your project that needs to talk to the database will be coded to talk to the Facade and use the general methods that you have defined.
The beauty of the pattern becomes evident when the customer decides to change the database. Instead of changing the database calls all over your application, you need only change the facade. The facade hides the complexity of it’s underlying classes and exposes a common set of methods that any user of the class would need. The users of your database facade won’t care if they are pointed to an Oracle, MySQL or SQLite database. All that they will need to know is the interface that is exposed by your facade.
So, when you are designing a system where the underlying pieces may change, consider using a Facade. Using this pattern will save you time and effort when your customer changes his or her mind, which they are apt to do.
Wednesday, October 20, 2010
Software design and Design Patterns
As part of my day job, I have been participating in interviews for prospective job candidates. In performing these interviews, I have realized that there is a general lack of knowledge of object oriented programming principals in the candidates that we have interviewed.
I am particularly surprised that most of the candidates have little or no knowledge of design patterns. So, I’ve decided to do a series of posts on this important topic. How many (or few) posts that I do on the topic are dependent on your feedback. If you feel like the topic is interesting and my posts are useful, let me know. If not, also let me know so that I can abort and spend my time writing about topics that are more interesting and/or relevant to you.
First things first, if you haven’t already read it, log on to Amazon right now and pick up a copy of Design Patterns: Elements of Reusable Object-Oriented Software by Gamma, Helm, Johnson and Vlissides. This is the undisputed bible of design patterns. The book is so well known that it is referred to as the GoF (Gang of Four) book. These guys coined the term “Design Pattern.” The book is well written and includes very readable plain language descriptions of the patterns, use cases for the patterns, UML diagrams that illustrate the design of the patterns and sample code that shows how to implement the patterns.
You may be wondering why design patterns matter. Well, there are at least a couple of reasons why you should learn about design patterns, not the least of which is that you will probably be asked about them in your next interview if you claim to know about OO software design.
First, design patterns provide a common vocabulary that you can use to communicate your designs to other developers. For example, when building applications that perform database access, I like to use a data access facade so that it is easy to change the underlying database without messing with other code. If you know what the Facade pattern is, you will immediately understand that I am talking about building an abstraction layer that provides a consistent interface to an underlying sub-component of a system, in this case the database. Don’t worry, I plan on covering the Facade pattern as the first in this series.
Second, design patterns provide proven solutions for common software design problems. Have you ever built an application that used only one instance of a particular class, for example a settings object that maintains all of the user defined settings for your application? Did you implement this class yourself from scratch? How did you ensure that there was only a single instance of this class at any time in your program? This is the very definition of the Singleton design pattern. This pattern ensures that there is only a single instance of the class at any time and provides a global entry point for access to that class. The point here is that you do not need to come up with new designs if you recognize that a pattern exists that meets your needs. After all, isn’t one of the goals of OO programming reusability? Why not reuse the same proven designs that have been successfully implemented in thousands of other applications?
If you are currently building iOS applications, whether you know it or not, you are already using design patterns. MVC, Model-View-Controller is a crucial pattern in iOS application architecture, one with which I am (almost) certain that you are already familiar. Delegation is another pattern that, while not documented in the GoF book, is well understood and prevalent in the iOS framework. My point is that you have nothing to fear. Patterns are your friend. Embrace patterns and your applications will be more robust, scalable and modular making it easier for you to enhance them in the future.
Next time, I’ll delve into the Facade pattern. Don’t forget to let me know in the comments if you think that this is a topic that I should continue to explore.
I am particularly surprised that most of the candidates have little or no knowledge of design patterns. So, I’ve decided to do a series of posts on this important topic. How many (or few) posts that I do on the topic are dependent on your feedback. If you feel like the topic is interesting and my posts are useful, let me know. If not, also let me know so that I can abort and spend my time writing about topics that are more interesting and/or relevant to you.
First things first, if you haven’t already read it, log on to Amazon right now and pick up a copy of Design Patterns: Elements of Reusable Object-Oriented Software
You may be wondering why design patterns matter. Well, there are at least a couple of reasons why you should learn about design patterns, not the least of which is that you will probably be asked about them in your next interview if you claim to know about OO software design.
First, design patterns provide a common vocabulary that you can use to communicate your designs to other developers. For example, when building applications that perform database access, I like to use a data access facade so that it is easy to change the underlying database without messing with other code. If you know what the Facade pattern is, you will immediately understand that I am talking about building an abstraction layer that provides a consistent interface to an underlying sub-component of a system, in this case the database. Don’t worry, I plan on covering the Facade pattern as the first in this series.
Second, design patterns provide proven solutions for common software design problems. Have you ever built an application that used only one instance of a particular class, for example a settings object that maintains all of the user defined settings for your application? Did you implement this class yourself from scratch? How did you ensure that there was only a single instance of this class at any time in your program? This is the very definition of the Singleton design pattern. This pattern ensures that there is only a single instance of the class at any time and provides a global entry point for access to that class. The point here is that you do not need to come up with new designs if you recognize that a pattern exists that meets your needs. After all, isn’t one of the goals of OO programming reusability? Why not reuse the same proven designs that have been successfully implemented in thousands of other applications?
If you are currently building iOS applications, whether you know it or not, you are already using design patterns. MVC, Model-View-Controller is a crucial pattern in iOS application architecture, one with which I am (almost) certain that you are already familiar. Delegation is another pattern that, while not documented in the GoF book, is well understood and prevalent in the iOS framework. My point is that you have nothing to fear. Patterns are your friend. Embrace patterns and your applications will be more robust, scalable and modular making it easier for you to enhance them in the future.
Next time, I’ll delve into the Facade pattern. Don’t forget to let me know in the comments if you think that this is a topic that I should continue to explore.
Friday, September 10, 2010
Detecting tap and double-tap with Gesture Recognizers
Now that I am finished with my book I am getting back to work on writing apps. In the original design for the current app that I am working on, I wanted a UIView that responded to taps and double taps. If you don’t already, know, as of iOS 3.2 there is a new way to handle user interaction events called gesture recognizers.
Gesture recognizers are basically exactly what they sound like; classes that you can use to recognize when a user has performed a gesture. Using gesture recognizers simplifies event handling because you do not have to write all of the code to track touches like you would have done in the past. You can simply create an instance of a gesture recognizer, configure it, and add it to a view. Then, when the gesture recognizer recognizes a gesture, it simply calls back a selector that you define.
UIGestureRecognizer is an abstract base class that you can use as a starting point to implement your own gesture recognizer. In addition to providing this base class, the iOS SDK provides several concrete UIGestureRecognizer subclass implementations that you can use to recognize the following gestures as documented in the iOS documentation:
Tapping (any number of taps) | UITapGestureRecognizer |
Pinching in and out (for zooming a view) | UIPinchGestureRecognizer |
Panning or dragging | UIPanGestureRecognizer |
Swiping (in any direction) | UISwipeGestureRecognizer |
Rotating (fingers moving in opposite directions) | UIRotationGestureRecognizer |
Long press (also known as “touch and hold”) | UILongPressGestureRecognizer |
In my case, I wanted to create two different actions, one for when a user tapped a view and another for when the user double-tapped. This may seem straight forward as you can configure the UITapGestureRecognizer to call a selector when it detects a specific number of taps by setting the numberOfTapsRequired property. So, my idea was to use a UITapGestureRecognizer with numberOfTapsRequired set to 1 to call a selector called handleSingleTap and a second UITapGestureRecognizer with numberOfTapsRequired set to 2 to call a selector called handleDoubleTap.
This was all well and good. When I built and ran my application, single tap event handling worked like a charm. Every time I tapped on the view, I saw the behavior that I expected. The problem occurred when I tried to double tap. The double tap selector was called as expected, however, the single tap selector was always called first. I guess that, in hindsight, I should have expected this as it is impossible to tap twice without tapping once. One particularly important thing that you should keep in mind when using gesture recognizers is that they are not a part of the responder chain. If you are relying on handling events using the responder chain and you introduce gesture recognizers, events that are recognized by the gesture recognizer will not be sent through the responder chain.
What I needed was a way to set up a relationship between the two gesture recognizers. I needed to be able to detect if a double tap was happening and if it was, to ignore the single tap gesture. Fortunately, Apple thought ahead and designed a way to do this into the architecture. This is a case where you only want the single tap selector called if the double tap gesture recognizer fails. To implement this, you send the message requireGestureRecognizerToFail: to the single tap gesture recognizer with the double tap recognizer as its argument. This tells the single tap gesture recognizer to wait to fire until the double tap gesture recognizer transitions to the UIGestureRecognizerStateFailed state. Doing this solved the problem. At this point, the correct selector was called when a double tap was recognized and the single tap selector was not called.
However, this caused another issue. The issue was that when a user would single tap, the action that would result from a single tap was delayed as the single tap gesture recognizer was forced to wait to ensure that the double tap gesture recognizer failed before calling the single tap selector. This behavior is documented in the Event Handling Guide for iPhone OS. For many applications, this may be acceptable, however the lag between a single tap and the gesture recognizer calling its selector was too long for my application. I searched for a way to adjust the timeout for a gesture recognizer to transition to UIGestureRecognizerStateFailed to no avail. It seemed that the only way to get the behavior that I wanted was to write some custom gesture recognizers.
In the end, I decided to not use the double click gesture recognizer and to handle my user interactions differently by not requiring a double tap at all. So, keep in mind that it is possible to set up dependencies between gesture recognizers however when implementing discrete behaviors for single and double tap, you may want to go a different route. Gesture recognizers are a convenient way to react to user input and can be configured in a variety of way depending on the needs of your application. If worst comes to worst, you can always write your own concrete subclass of UIGestureRecognizer.
Subscribe to:
Posts (Atom)